
- Blueprint Interface & Basics -
Blueprint Interface
Welcome! In this section we will be talk about what Blueprints are, how do they work and how we use the Interface!
There are two types of code in Unreal Engine. One is the well known C++ code in a traditional manner. Another one is called Blueprint, which is also a C++ code but is created in a visual scripting environment, which a UF2D developer will mostly be spending its time with.
UF2D comes with many pre-determined Blueprints for you to easily speed up the process of developing your game. Here is an example;

Everything you see here; 2 Fighters, Game UI, Team UIs, Stage, invisible collisions for Stage Ground, Walls etc are all blueprints are you can check their code and see how they work.
Note that not every Blueprint needs to have visuals. Fighter Blueprints obviously have them while State Module Blueprints that contain State Definitions of a Fighter, don't.


Fighter Blueprint with lots of visual Components.
Omen's Intro State Module, having none.
We will get to editing Blueprints later. Now let's see how we create them. There are a few but for now the most basic one is this; [RMB] click in an empty space of Content Browser and select "Blueprint Class" in Create Basic Asset tab. After that select "Actor" and rename it all you want. You can open the Blueprint by [Double LMB] clicking on the newly created file.
Just as an extra, you can drag via holding [LMB] and drag any visuals into the Visual tabs. You can see "Details tab" on the right side of the screen where you can edit stuff related to it.
All the steps are shown in the video below;
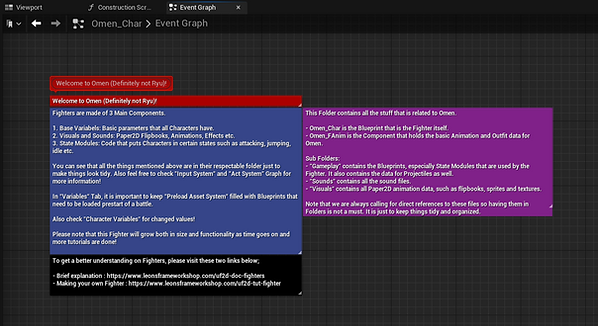
Before we get in further detail, let's check the Blueprint Interface itself! We will be using "Omen_Char" to check things out. Feel free to go "Content -> External -> FR_TutorialData -> Fighters -> Omen" and [Double LMB] click on the Blueprint!

1- Toolbar


"Compile": After are done with the visual codding, we use this button to check if everything is working correctly or not. Keep in mind that Unreal Engine automatically compiles at the start of the gameplay so no need to worry if you forget to press this button.
"Save": Use your imagination!
"Browse": Focuses on a Content Browser and changes the location to where this Blueprint is.
"Find": Opens the "Find" tab below.
"Hide Unrelated": Hides the blueprint nodes that are NOT connected to your current node selection. Might be useful if you are doing some extreme spaghetti code.
"Class Settings & Defaults": Both of them opens a "Details" panel to the right. Class "Settings" are mostly related to Actor properties while "Defaults" gives a long list of all values for the Blueprint that you can check and edit.
"Simulation": Button that makes the Blueprint act as if it is in game. UF2D does not really benefit from this as all our blueprints need other blueprints to be present in the game to properly work.
"Play Config": Starts/Stops the Game etc. Same buttons as the ones on Unreal Engine's own Interface.
"Debug Filter": VERY useful to see what your code is doing dynamically so you can debug it with visual cues. The dropdown list grows depending on how many of the same blueprint you have in the scene. As the video shows below, we will make sure "Omen_Char" is a Fighter in the scene and toggle Framework on. Now we can check if the "Input System" is working properly. Don't forget to toggle Framework off later on!
2- Components
As the name implies, Components tab shows you what components are currently in the Blueprint. Note that not every component need to be visible in game, such as the very first component named "Scene" which has the only job of storing other Components under its wings.
You might be overwhelmed at first, especially thinking "How will I make a Fighter with components?" and the answer is that, you don't need to. UF2D comes with premade systems that already have what's needed so even if you don't understand what's happening in the image to the right, it will be easy to use them with parameters provided.
This of course goes for everything that is visually in the scene, such as Projectiles and Effects such as hitsparks. Core parts are handled by UF2D and you just enjoy editing parameters. We will get to those eventually.

3- My Blueprint
"My Blueprint" tab contains all the core features of your visual code. You can take it as a summary of what you have and can interact with.
Each Section contains the data corresponding to their type. Such as all your Visual Code Graphs are stored in Graphs, functions are in function section and so on. You can add new stuff with "+" icons on the right end side of each section.
We will slowly get into each functionality in every Graph possible, for now just keep the basics in mind!

4- Compiler & Find Results

Names are pretty self explanatory. Compiler Results shows the result of your compile and tells if you there is a warning or an error while providing you a link to directly to go the visual code where they occur. Find Results find the words in your Blueprint or in ALL places if you press the binocular at the right end of the section.
5- Details
Another self explanatory section where you can see all the details of anything you click in the Menu. This includes everything such as variables and functions.
It can be rather useful especially when you need to check variable values as a list. However of course this goes for everything that got properties.

6- Viewport / Construction Script / Event Graph

Viewport is where you can see all the stuff that will be shown in the game when the Blueprint is in the scene. Objects can be set to "Hidden in Game" in details tab to have them visible in Editor and not in game (such as the red outline beneath Fighter in the image very above). Every Blueprint that can have something visible on the scene has a Viewport.
Holding and dragging [LMB] will move you in X axis while both [LMB] and [RMB] together will move you in Z axis. Holding and dragging [RMB] will let you look around.
Construction Script is a Function/Graph hybrid that almost every blueprint type has. We will get into functions later. However the thing that is special about this one is, it triggers every time you update the blueprint and compile it.
One good example is how "Character Flipbook" of a Fighter changes visually on Viewport when you change its "Idle Animation". Video below has the demonstration;

Notice how the look of Omen on the screen is updated? This is a Construction Script that belongs to "Character Core" which is the parent class of all Fighters. We will also get to parent/child interaction of blueprints soon.
Event Graph is a Graph that every Blueprint has and it can't be deleted. This is where your code stuff is mainly contained if not in functions, macros etc. You can have as many as Graphs you like. We will talk about how to use it in the next section!
Blueprint Basics
In this section we will be talking about how to use the Blueprints in general. Note that we will not cover every single detail now (such as Timeline Components). However we will get to more advanced parts while developing the fighter named Omen.
1- Disable UF2D
Before we start, it is better that we disable UF2D for now as we will learn how to use blueprints on an empty Actor on the scene. Click on the Framework Kickstarter Actor (White Sphere) and in "Details" tab, go to "Framework" title and set "Framework On" bool off as video shows below;
2- Preparation
Now that Framework is disabled, we are completely free to use Unreal Engine itself. Now let's make an empty Blueprint Actor and fiddle with it. In any empty place of a Content Browser, [RMB] and in "Create Basic Asset" tab select "Blueprint Class". Unreal will then ask you what type you want. For now lets select "Actor". It will give us the most basic asset that is empty and easy to work on. Also don't forget to give it a cool name!
Double [LMB] click on the newly arrived blueprint of yours and Unreal will open the editor for the blueprint you are kind of familiar with at this point. Before we work on the blueprint itself, we need to put it on the map. Let's give it a visible component too!
Just for the sake of fun and learning, in Content Browser search for "Ken_Idle_FB". This is an animation that Ken uses for standing around. Hover on the asset and drag it by holding [LMB] to put it on "DefaultSceneRoot" that your BP has as shown in video below. You can also once again drag via holding [LMB] and put it directly on the "DefaultSceneRoot" to make the Flipbook the new Root.
PS: If you open a Blueprint that has nothing going on, Unreal will open a "Data Only" version of the editor. Just select "Open Full Blueprint Editor" just like I do in the video below;
Note that every Blueprint has a root. Root is what everything is linked to. When you make a Blueprint move, it is the Root that moves and that everything is connected to it. You can assign different roots just like we did now. Now let's just drag the Blueprint into the Map by click and drag with [LMB] then change its location and size to make it larger.
Notice that we pressed "Simulate" instead of "Play". We don't need to engage all type of things such as Controllers. We just want the gameplay to start. In this case we can just simulate the gameplay, not actually play in it;
Our blueprint is in the scene, but it isn't doing much other than Ken's idle animation being on loop. Let's start the actual coding process!
3- Fundementals
-
Let's talk about moving in Graph first. It is very easy. [MMB] scrolling to zoom in and out. Hold and drag [RMB] to look around;
-
Interacting with the nodes in the Graph is easy too! Select via [LMB], Grab and hold [LMB] to move them around. Same command can be used to group grab nodes.
-
Grab and Hold [LMB] on an input or output allows you to interact with other ones and connect each other.
-
[RMB] on an empty place to get new nodes!
-
You can hold [CTRL] key and release after pressing [LMB] to move a connected input or output around to connect somewhere else.
-
If you want to clear a connection, hold [Alt] key and click [LMB] once!
-
You can drag from all output and inputs of a node via holding [LMB] and once released Unreal will give you a list of what you can use specially for what you dragged from! It works in reversed direction too (shown as we make a new string variable).
-
You can copy selected node(s) Via CTRL+C (or cut with X) and put via CTRL+V. Deleting can be done with Delete Key as well.
-
After selecting a group of nodes, [RMB] clicking will let you choose a way to make nodes look tidier! Here we select "Straighten connections".
-
Nothing matters if your code doesn't look clean and tidy though! "Reroute Node" is a big help on this matter.
-
Double [LMB] over a line, [RMB] on an empty space and selecting "Reroute Node" or doing the same via dragging a connection line are the ways to have one in the graph!
4- Variables
-
Variables are extremely important and we will be using them a lot. UF2D alone got thousands of them!
-
Creating one is extremely easy. We can use "My Blueprint" tab just to make one and change its type from "Details" tab on the right. Changing its name can be done by [LMB] clicking on it after a small amount of delay, pressing [F2] while it is selected, or directly on "Details tab."
-
Dragging a Variable from "My Blueprint" tab via holding [LMB] and putting it down on the Graph gives as two options to either have a "Get" or a "Set" node.
-
Dragging from an Output or Input also lets us have a "Get" or "Set" node automatically created for us.
-
Another way of making a variable is dragging from an input and selecting "promote to variable".
-
We will be using variables a lot when the time arrives. For now knowing how to use them is enough!
5- Events
-
Events are nodes that are called from gameplay code to begin execution of an individual network within the Event Graph.
-
There are two types of Events. One that is literally called "Event" which belongs to Unreal Engine as base and other one is "Custom Events" that we can create on our own.

-
Two main Events we will be seeing a lot around is "Event BeginPlay" and "Event Tick"
-
"Beginplay" triggers when the Actor is spawned or when Game starts if the Actor is already present. "Tick" triggers all the time, depending on its interval amount (default is every frame).
-
Another type of Events is something we will use a lot and called "Custom Event." These are the trigger nodes that we can have our own as Unreal Engine's self events are not enough.
-
[RMB] clicking on Empty Graph or dragging from an execution input and selecting "Add Custom Event" allows us to create one.
-
We made our Custom Event, but we need a way to trigger it. If we are in the same Blueprint, it is as easy as [RMB] clicking on Event Graph or dragging from an execution line to search for the name we gave it will give a Blue Colored Node of same event we have, which indicates that it is a Trigger.
-
There are many other ways to call an event, especially from other BPs but we won't talk about them now.
6- Macros
-
Macros are just a group of nodes. It is another way of making your Graph tidy and clean if you are going to constantly use a network of nodes.
-
If a macro got a "Clock" icon on top right corner, it means it got an async function such as a "Delay" node.
-
Note that Marcos do NOT optimize your code and they can be called only in whichever blueprint they belong in.

-
There are two ways of making a macro. One is from "My Blueprint Tab" and pressing "+" button. Give it a cool name and double [LMB] click on it to edit.
-
Editing it is same as if we are in Event Graph. [RMB] on empty space to get nods you want. However we got two extra permanent nodes that are named "Inputs" and "Outputs". From the "Details" tab on the right, we can add variables and execution connections. Dragging pins also add them.
-
Macros can also be made by selecting a group of nodes.
-
They can contain macros and functions within.
-
Macros also don't need an Execution Pin (white) to work. They can also have variables in their inputs and outputs.
7- Functions
-
Functions are also a group of visual nodes like Macros. However they are special in their own ways.
-
They allow you to optimize your code, meaning that having a function instead of a macro will reduce your file size and compile time. (That's why UF2D has thousands of them while having as little as macros possible).

-
Unlike Macros, they can be called from not only whichever blueprint they are in, but also from other blueprints.
-
However, they can NOT have async functions within them such as Delays. Functions are meant to input and output data in the same frame. Functions can contain other Functions and Marcos (as long as they don't have async functions).
-
Functions can be created in "My Blueprint" tab by pressing the "+" Button just like Macros, or selecting a group of nodes and we can edit them by double [LMB] clicking.
-
Every Function has an "Entry" and "Return" Node. This can not be changed. Functions are meant to return data in the same frame after all.
-
However, there is a mode for Functions called "Pure", which allows us to bypass the need for linking them with execution inputs and outputs.
-
They still work as intended but makes your graph cleaner with less exec pins as much as possible.
8- Parent / Child Blueprints
-
One of the most important things in Unreal Engine is to understand the relationship with Parent and Child Blueprints.
-
Every Blueprint is a child of another, which is a child of another and it goes on. If we check our Blueprint that we have been using, we will see in top right corner that it is a child of a Parent Class: Actor. That means our BP inherits all the functions, properties and variables of Actor Class. If you are wondering why our BP had events such as "Beginplay" and "Tick" already there, that's why!

-
First let's create another Blueprint and name it "Parent_BP".
-
There are two ways to inherit from this BP. First is, select the newly created BP and [RMB] click on it and select "Create Child Blueprint Class".
-
Other way you can use if you already have a BP and you want to change its Parent Class.
-
Open the Blueprint Editor and on top left corner, select and open "File" tab and select "Reparent Blueprint" and select the BP you want.
-
Just be very careful with this as it can be quite chaotic to reparent if your BPs are really heavy code-wise. It is better to prepare everything before you start coding.
-
Since we can inherit functions, events and variables, we don't need to redo them for Child Blueprints.
-
UF2D has tons of Child/Parent relationship and we will be inheriting a lot of Parent Classes during our time of coding!
-
In other sections we will be also overriding such functions to make our own!
9- Comments
-
There are two types of Comments in Unreal Engine.
-
First one is having small comments on nodes. When we mouse over a node, an icon appears on top left corner that we can edit to our liking!
-
Second one is a big one that can cover a set of nodes, change its properties in details panel. After selecting a group of nodes (or just one), press [C].
That's all for the basics of Unreal Engine for now. Next section will be about the Material Basics! Thanks for your time and reading!